Jam for Tea!
‘Doubtless God could have made a better berry, but doubtless God never did’. Dr William Butler
We all hold this nostalgia-tinged idea of the perfect British summer’s day; hazy golden sunshine, picnics in the park with no wasps, ice-cold Pimms, tennis and, of course, perfect strawberries. Even for those who would never go near a pick-your-own, everyone seems to be able to remember a day from the past when strawberries were so sweet and juicy that they tasted like the very essence of the summer.
I sit here typing this on what should be just such a beautiful June afternoon; however, in what has become the norm these last few years, it is raining, grey and dreary. In the hope of evoking part of what is part of the sepia-tinged dream of a perfect British summer, I turn to strawberries.
Now is the very best time to buy and eat British strawberries. The season started a little late this year due to all the rain, but now it is in full flow. When choosing strawberries, look out for Sonata, Sweet Eve and Eve’s Delight, all of which are high in natural sugar with a gorgeous perfume and longer shelf life than some other types. Avoid at all costs the ubiquitous Elsanta, which accounts for a staggering 80% of all supermarket sales of strawberries in the UK. This is because they are cheap and easy to grow-even if they seem to look and smell great, please don’t be fooled. They have a habit of tasting like wet cotton wool rather than a fruit; they are a poor substitute for the real thing.
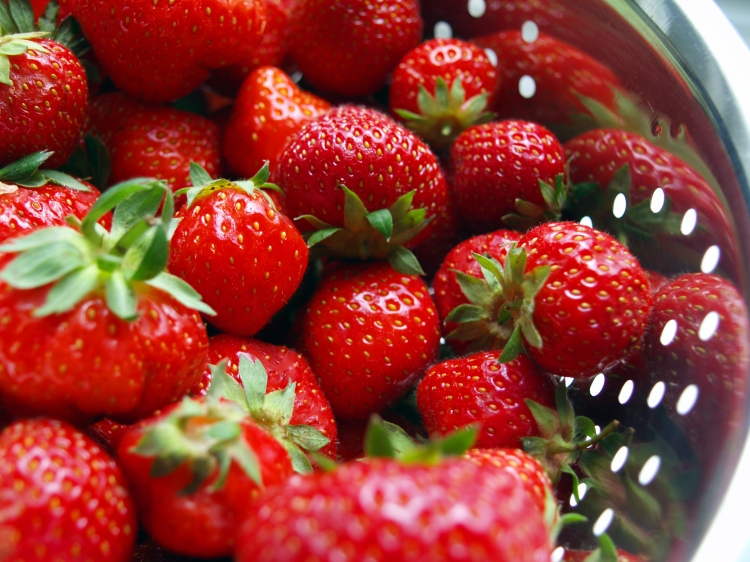
Beautiful English strawberries
If, like a lot of people, you can’t get to a pick-your-own, the best places to get strawberries are usually farmer’s markets; instead of a hefty £2.50 for a tiny punnet of Elsanta awfulness in the supermarket, I got four boxes of beautiful Sonata strawberries for £3 the other day. Look for berries that are unblemished and bright red with fresh-looking green leafy caps. The fruit should be not too firm and not too soft (there should be no dampness on the bottom of the container). The scent is a brilliant indicator of quality and should be slightly floral, fresh and almost uplifting in its sweetness. Smaller strawberries often have more flavour, but do not discount the big juicy ones either. They are a fruit that absorbs water really easily and so it is best not hull them before they are washed.
Of course, when strawberries are as good as this, they need nothing added to them to make them sublime to eat. A little cream, perhaps some vanilla ice-cream. It is easy to while away the summer doing just this and suddenly, come September, they are gone for another year.
To ease this inevitable dissapointment, I have been experimenting with the oldest way of bringing a bit of the wonderful parts of the English summertime to any grey day. In other words, jam. I want all the perfumed, sticky sweetness that only good jam can bring. Good bread and jam-what could be better?
I know what you are thinking; it’s just too much hassle, too difficult and fiddly, with expensive thermometers, sterilising and scary boiling sugar. Anyway, who has time to make their own jam these days? Until quite recently, I thought the same thing, especially as I thought I was quite happy with the jam I was buying from the local deli. However, I was converted when I realised how simple and quick it is to do. In total honesty, this recipe is genuinely very easy and the result is better than anything you can buy. I have found that you do not need special jam sugar, a jam thermometer or an expensive preserving pan. All you need is the biggest stainless steel pan you have, as the jam bubbles up quite alarmingly as you boil it, any kind of glass jars you may have accumulated and some great fruit. The only ‘specialist’ equipment you might want to use are the small waxed discs you can find in a lot of supermarkets and in any kitchen shop. These stop the jam getting any mould on the top, but this shouldn’t be a problem if you sterilise the jars properly. In any case, it will probably have been eaten before there is a chance of any mould growing. It also saves a lot of mess if you have a funnel of some sort, but you can manage without one.
You can also add any other flavours that take your fancy and you will end up with a jam you could never buy in the shops. you can add raspberries, blueberries or redcurrants. you can even add a slosh of Prosecco or Champagne if you are feeling flush. What you must not do is leave out the lemon; jam needs something called pectin to set. This is the secret ingredient in jam sugar, but there is enough pectin in the lemon juice to make this jam set. You can use jam sugar if you want the reassurance, but I find it gives quite a tough set to the jam.
At the risk of sounding like a 1950s housewife, it is also nice to feel a bit smug and terribly domesticated to have someone taste it and ask where you bought it. ‘Oh this, it’s homemade actually.’ I have seen lots of really cute labels and fabric covers to use on your jars-I love these but for some reason, all I seem to be able to stretch to are Post-It notes which keep coming off. Oh well, I obviously must work harder on this domestic goddess thing.
Strawberry and Vanilla Jam
makes about 4 average sized jars
Ingredients
1kg strawberries, washed and hulled
800g caster sugar
Juice of 2 lemons
2 vanilla pods, seeds scraped out
Method
First, sterilise your jars; this simply means washing the jars and lids in hot soapy water, rinsing and popping in an oven set to about 140°C while you make the jam. Nothing scary.
Put a saucer in the freezer.
If you have a blender, blitz the sugar and the whole vanilla pods together so you have a beautifully speckled vanilla sugar. If you don’t, just scrape the seeds into the sugar and mix, adding the pods as well. Put your strawberries in the pan and cover with the sugar. Keep about 10 of the smallest strawberries back so they stay whole-an unknown treat in bought jam. Leave overnight if you have the time, otherwise, an hour will do.
Add the lemon juice, take a potato masher or fork and roughly mash the strawberries and sugar together. It is better if you keep some texture to the strawberries rather than bash them to a puree. Add the reserved whole strawberries and put the pan on a very gentle heat and stir gently. It’s really important to melt the sugar slowly, otherwise the jam will have sugar crystals in it.
When the sugar has completely dissolved,bring the heat up to high. Keep stirring the mixture until the mixture is boiling. This can be the alarming bit-the mixture will rise high up as it boils and look quite volcanic.
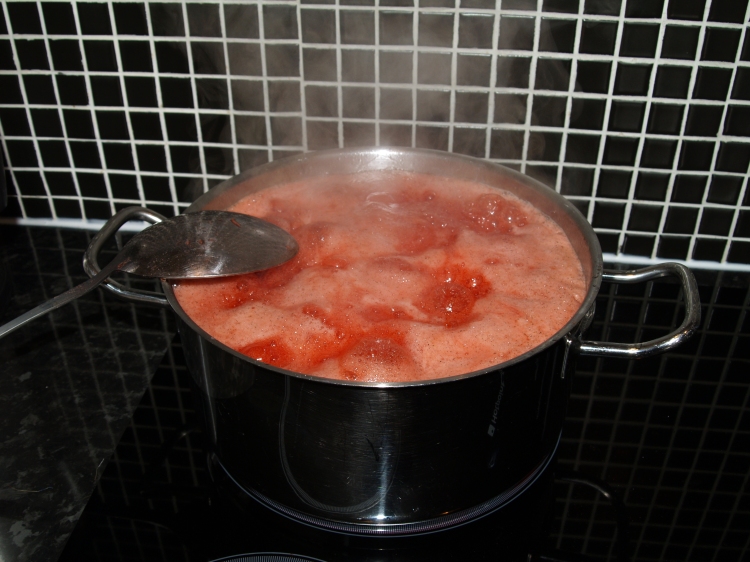
Boiling the jam
Keep the mixture at a roiling boil for about 20 minutes, stirring occasionally.
Take the pan off the heat and get your saucer out of the freezer. Place a small dollop of the mixture onto it. Leave it a moment and then push the edge of the dollop gently with your finger. If the surface wrinkles, your jam has reached setting point, if it doesn’t, put the pan back on the heat and boil for another 3-4 minutes. Repeat the saucer test until the surface of the mixture wrinkles on the saucer and you can see the jam has set.
Take the pan off the heat and leave it to rest for 15 minutes. At the same time, take the jars out of the oven, being careful not to touch the inside of the jar or the lids. You need the jars warm when you fill them, as cold jars will crack when filled with hot jam. I know this from bitter experience.
After fifteen minutes, use your funnel, or a large spoon, to put the jam into the jars. Do be careful, as the mixture will still be really hot. Fill to the brim and place a waxed disc on top. Screw the lid on tightly and leave to cool completely.
This jam will last for up to a year if stored in cool place, out of direct sunlight. Once opened, it must go into the fridge.
http://www.appliancesonline.co.uk/summer-lovin